Full Installation of Nano
- Q&C Watercoolers

- Feb 10, 2022
- 3 min read
Updated: Mar 23, 2022
Table of Content:
Filter installation
If you have the Q&C Installation & Filtration System, follow the instructions below to install it. If you use another type of filtration system, check for information regarding that product’s installation, then go to the Installation (Piping) section in this manual to continue setup.
1. Find a suitable location for the filter. In the kitchen, we sug- gest locating it under the counter near the cold water angle stop valve. The cartridges must be installed vertically, so that they hang down.
With the filter cartridge removed, hold the filter head in the selected location and mark the positions for the screw holes.
Remove the filter head and insert the screws into the marked areas, leaving the heads protruding slightly.

2. Assemble the filter
Install the quick connectors in the top of the filter head. We recommend you install these by hand to prevent damaging the connectors. Use extreme care if you need to use tools.
Insert the filter cartridge into the filter head by inserting and twisting it until it is fully engaged.
Attach the filter assembly using the screws installed in the previous step.

3. Install the Nano adapter on the angle stop valve that provides water for the system.
Close the cold water angle stop valve and remove the attached pipe using a wrench.
Screw the Nano angled adapter onto the stop valve.
Install the pipe that was removed in Step 1 into the Nano angled adapter.

4. Connect the pipe to the angle stop valve adapter.
Turn the quick-connect fitting on the angle stop valve slightly to open it.
Attach a suitable length of pipe to the power fitting, just enough to reach the filter head.
Turn the quick-connect fitting to tighten
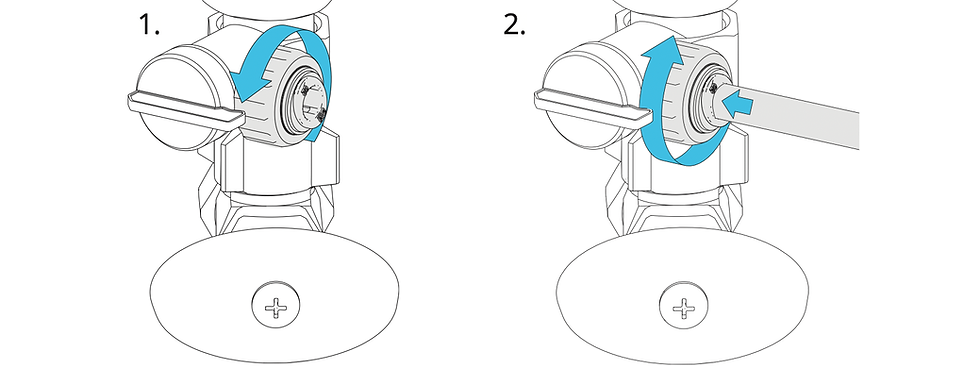
5. Connect the pipe to the filter head.
Insert the pipe into the quick-connect fitting. Pay attention to connect it to the inlet side!

Piping
From the under-counter filter, there are several ways to route the 1/4” flexible water pipe to your Nano. Here are three possible solutions.

A. Drill a hole under Nano | B. Drill a hole behind Nano | C. Go around |
You can fully hide the water pipe and even the electrical cord. To do so, you’ll need to drill a hole around 5 cm in diameter. 1. Before drilling, check to make sure no drawers or hardware will interfere and that the pipe will reach. 2. Decide where you want to place your Nano and mark the center. Drill a 5 cm diameter hole. | Another solution is to drill a small hole near the back of the counter to reach the undercounter filter. In this case, you can hide the pipe in a cable channel if you want. 1. Drill a hole in the countertop, at least 7 mm in diameter, to reach the filtration system. 2. We suggest using angle fittings to direct the pipe along the counter and through the hole. | You can also install Nano without drilling through the countertop. 1. Below the counter, drill a hole through the shelf wall or bottom side. Feed the pipe over the side and through the hole. 2. Use cable channel for fixing and hide the water pipe. |
Nano connection
Connect Nano to the filtration system.
1. Lay the Nano down on a soft cloth to protect it while you access the inlet water connector on the underside.

2. On the bottom of your Nano, you will find a water inlet connector. There are two options for leading and fixing the power cable and pipe, based on your piping installation.

For Piping A
For A type piping, there's no need to use the pipe holder part.
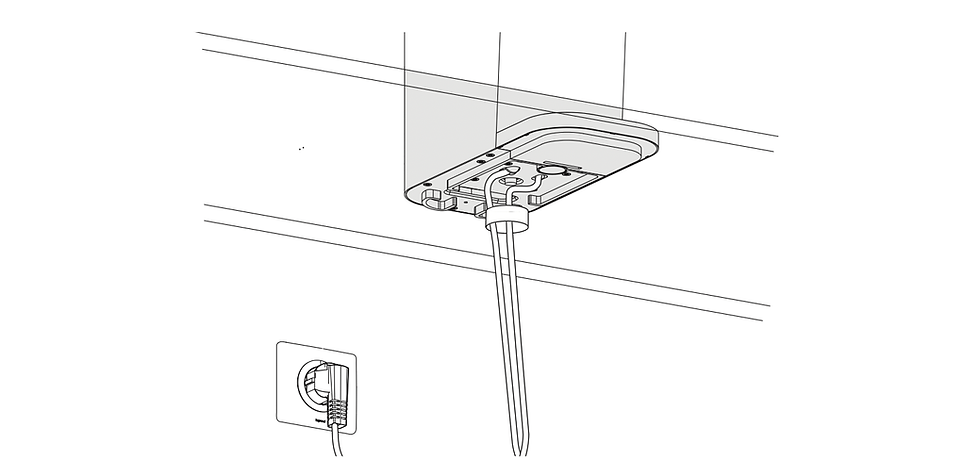
For Piping B or C
For B or C type of piping, install the pipe holder part to the bottom of Nano. This will fix the power cord and the water pipe in the right place.

Leakage Check & Power-On
Once everything is connected, carefully check the installation for any leaks.
1. Open Filter Head Open the filter head valve if it is in the closed position.

2. Open the angle stop valve adapter
Open the angle stop valve adapter if it is in the closed position.

3 Open the angle stop valve
Slowly open the angle stop valve. If you notice any leaks, fully close the angle stop valve, tighten any leaking connectors, and then try again.

4. Power ON
Once the connection to the main water supply is complete, you can connect your Nano to the power socket. Nano will start automatically as soon as the power is connected.
Note:There is no ON/OFF button on the Nano.

Comments